Software Installation and Configuration
Note
Please check out our tutorial video on Youtube for a detailed step-by-step guide through the installation.
Operating System Compatibility
In synthetic mode, this code was tested on a Dell Precision 5820 Tower operating Window 10 (64 bit) with 64 GB RAM, an Intel Xeon(R) W-2155 CPU @ 3.30 GHz processor, and an NVIDIA Quadro P4000 graphics card.
Get ready
Install Python, Git and Anaconda/Miniconda
Make sure you have Python and Anaconda or Miniconda installed on your system. Next, please make sure you also have Git already installed installed on your system. For a user-friendly experience, GitHub Desktop is a nice software tool to clone and handle repositories. As an IDE, we recommend PyCharm.
Create a directory where the repository will be cloned
Open an Anaconda Prompt or PyCharm and go to the Terminal (Command Prompt)
and enter the following to create a folder and change the working directory to this path.
(base) C:\Users\Username> cd Documents
(base) C:\Users\Username\Documents> mkdir MicroscopeControlCode
(base) C:\users\Username\Documents> cd MicroscopeControlCode
Download the code from Github
Now, clone this repository to your local path.
(base) C:\Users\Username\Documents\MicroscopeControlCode> $ git clone https://github.com/DaetwylerStephan/self_driving_multiscale_control.git
Now you have the code ready in the folder MicroscopeControlCode.
Initialize a conda environment for your control code
Now, as a next step, generate a dedicated Conda environment for the control code.
(base) ~\MicroscopeControlCode> conda create -n microscopecontrol python=3.9
(base) ~\MicroscopeControlCode> conda activate microscopecontrol
(microscopecontrol) ~\MicroscopeControlCode> $
Note: This environment uses Python version 3.9.
Installation of the software
Now navigate to the folder “self_driving_multiscale_control”, where the setup.py and requirements.txt file are located, and install the software:
(microscopecontrol) ~\MicroscopeControlCode> cd self_driving_multiscale_control
(microscopecontrol) ~\MicroscopeControlCode\self_driving_multiscale_control> pip install .
Run the microscope in synthetic mode
Now, as we have no hardware installed, we can run the microscope in synthetic mode, which simulates all hardware components:
(microscopecontrol) ~\self_driving_multiscale_control> cd multiScale
(microscopecontrol) ~\self_driving_multiscale_control\multiScale> python multiScale_main.py
Note: The miroscope automatically sets the path to save images. If you do not have a “D:” drive, change the “parentdir” and “disktosave” parameters in the configuration file (see below) to successfully run the synthetic microscope. In case this is needed, rerun “pip install .” after making the changes.
Next, to run the microscope as described in our paper, we need to install all hardware components.
Hardware driver installation
Before continuing now with running the software, we need several hardware drivers for camera, stages and analog output board.
Camera drivers
To run the Photometrics camera (and control software code), please download both camera drivers from the manufacturer’s homepage.
First download and install the Pvcam drivers for the camera software: https://www.photometrics.com/support/download/pvcam
and download and install the SDK (with Python support): https://www.photometrics.com/support/download/pvcam-sdk
Next, navigate to the PyVCAM folder and run the setup install command:
(microscopecontrol) ~\self_driving_multiscale_control> cd PyVCAM-master
(microscopecontrol) ~\PyVCAM-master> python setup.py install
Errors we encountered:
The script did not recognize (find) the right path to the environmental variable of the system. To obtain it, check the environmental variables:

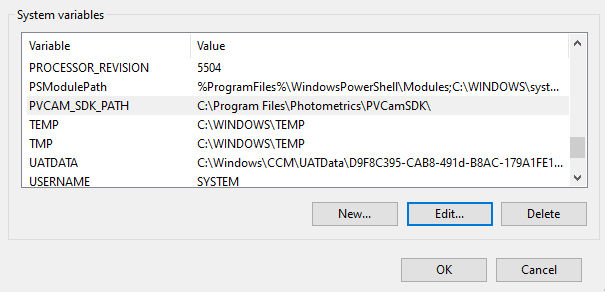
and modify the path in the PyVCAM-master/setup.py file accordingly:
pvcam_sdk_path = r"C:/Program Files/Photometrics/PVCamSDK/"
#pvcam_sdk_path = os.environ['PVCAM_SDK_PATH']
When running “python setup.py install”, the code requires a C language compiler for the camera code. If you encounter this error, please go to https://visualstudio.microsoft.com/downloads/ and install a Visual Studio with C and C++ support:

NI card drivers
To install the drivers for the NI board, please go to: https://www.ni.com/en/support/documentation/supplemental/06/getting-started-with-ni-daqmx–main-page.html
and install it with suggested additional installs.
Smaract
To install the driver for the Smaract stages, first install the drivers provided by Smaract when receiving the Smaract device.
Next, navigate to the Smaract folder and run the setup install command:
(microscopecontrol) ~\self_driving_multiscale_control> cd Smaract
(microscopecontrol) ~\Smaract> pip install .
Configuration file
Now, depending on your available hardware and disks, define the configuration file in
multiScale/auxiliary_code/constants.py:
For a synthetic microscope without any hardware available, define it as:
parentdir = "D:/multiScope_Data/"
disktosave = "D:\\"

# Synthetic microscope.
lowres_camera = 'Synthetic_camera'
highres_camera = 'Synthetic_camera'
filterwheel = 'Synthetic_Filterwheel'
rotationstage = 'Synthetic_RotationStage'
translationstage = 'Synthetic_TranslationStage'
ni_board = 'Synthetic_niBoard'
For the full self-driving microscope as described in the paper with all hardware available, set:
parentdir = "D:/multiScope_Data/"
disktosave = "D:\\"

lowres_camera = 'Photometrics_lowres'
highres_camera = 'Photometrics_highres'
filterwheel = 'Ludl_filterwheel'
ni_board = 'NI_Board'
rotationstage = 'Smaract_RotationStage'
translationstage = 'Smaract_TranslationStage'
Note that you also set the folder where you save the data here (parentdir) and indicate the disk where the data is saved here (disktosave).
Note
Please note that you run “pip install .” every time after you change any part of this code.
(microscopecontrol) ~\self_driving_multiscale_control> pip install .
Run the code
Now it is time to start the full code:
(microscopecontrol) ~\self_driving_multiscale_control> cd multiScale
(microscopecontrol) ~\self_driving_multiscale_control\multiScale> python multiScale_main.py
Troubleshooting
Graphics card (Napari issues)
If you encounter an OpenGL error, please make sure you have a Graphics card that allows to run Napari independently of this software:
https://napari.org/stable/tutorials/fundamentals/installation.html
Proxy issues (Download errors)
If you run the code at an institution with a firewall, you may need to change the proxy
settings to enable pip and conda to download files.
To do so, change your system environment variables (Windows). You obtain the port number (1234) and proxy address (http://proxy.your_university.edu) from your system administrators.
Variable = HTTP_PROXY; Value = http://proxy.your_university.edu:1234
Variable = HTTPS_PROXY; Value = https://proxy.your_university.edu:1234
If you continue to have issues then change the value of Variable HTTPS_PROXY to http://proxy.your_university.edu:1234
If this does not resolve your download/proxy issues, also update the configuration files for conda and pip to include the proxy settings. For Windows, the paths are saved at:
The
condaconfiguration file can be found at C:\Users\UserProfile\.condarcThe
pipconfiguration file can be found at C:\Users\UserProfile\pip\pip.ini
See also these Stackoverflow discussions on : Anaconda condarc files and Pip.ini files and Pip ini configuration.
Alternatively, set the proxy from Anaconda Prompt as follows:
set https_proxy=http://username:password@proxy.your_university.edu:1234set http_proxy=http://username:password@proxy.your_university.edu:1234